Getting more out of SharePoint and the Power Platform by using a library with meta data tagging.
Overview
There are many ways to integrate SharePoint with the Power Platform/Dynamics 365. The most common method I come across in my client work and on the web, involves automatic creation of folders related to a record, like a contact. The idea is rooted in how most professionals grew up using file storage where folders are nested within folders to categorize and sort. This is intuitive and was the natural step taken by earlier developers in the 1980’s who simply digitized real world paper filing cabinets.
While this is familiar, it is greatly flawed in that it requires training and familiarity with the file structure to store and locate documents. Anyone who has ever had to train a new hire on the company filing system, knows that without discipline across the organization, filing records can quickly become an out-of-control mess, slowing response time, and losing historical knowledge.
Enter the properly utilized SharePoint Library. This series of blog posts will outline a structure and series of techniques to store documents in a way that anyone can use search or filtering to find all relevant files, without learning how to save files or properly label them. Using a combination of Power Automate flows and a properly structured library, I will demonstrate a modern way to keep company records in check throughout an organization with minimal effort and maximum speed.
Part 1: Structuring your library
When you first crack open a freshly provisioned SharePoint site, the lack of structure can be intimidating. Too often I see companies simply begin to recreate the traditional nested folder structure, which at first retains some semblance of discipline and eventually digresses to a free for all with every department/staff member growing their corner of the system as they see fit. There will always be a place for folder storage, but this series is about effectively connecting CRM files en masse, not one-off departmental memos or SOPs. Most organizations end up with the bulk of their file storage going to a few types of documents that can be directly connected to something in their CRM, examples include patient records, sales documentation, repetitive reports, invoices, quotes, etc… A typical workflow is that these documents somehow originate from the CRM system and need to be stored in an easily accessible place. Perhaps a quote is generated by a salesperson and stored in connection to the opportunity record, or a contact emails a user an important PDF that should be saved for future reference.
When first setting up SharePoint, I recommend creating a new Document Library plus a folder to hold document templates. But first, it is important to take stock of what types of documents will need to be stored as the company may be best suited to having multiple libraries if there is minimal overlap between different departments. In the following examples, I will refer to a client of mine that is managing patient records with the primary relationship being to a contact record and secondary connections to their account. I created a singular “PDF Library” and another folder to hold document templates. You can create as many Libraries as make sense for the business case, but to keep things simple I will only refer to this one.
Step 1 – Create Template Folder
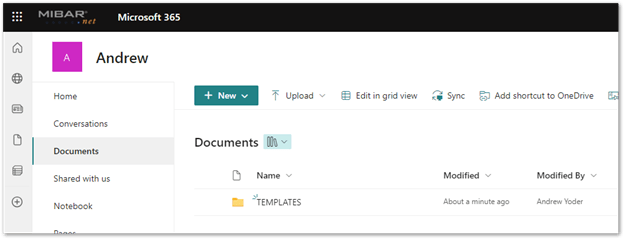
Creating the template folder is straightforward, it should sit at a top level in the SharePoint site and later on I will discuss creating and keeping Word templates in here so that Power Automate can pass data through them and create nice looking documents to store in the library. Here I just added a new folder called ‘TEMPLATES’ to my SharePoint Documents:
Step 2 – Create Library
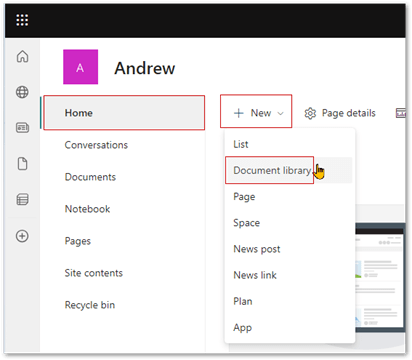
Next, add a new Document Library by going to the home area, clicking New > Document Library.
This is where things start to differ from the traditional way I have seen organizations store their records. We will not create any folders, rather this is the first step towards creating a sortable, searchable document database. It will look more like Excel than File Explorer.
Step 3 – Create Human Readable Columns
Next, we will click the “Add column” button so we can store relevant meta data about the documents. In our example of storing patient reports, these columns could include patient name, report type, facility name, doctors name, and date of treatment. These columns are for adding information that a human might know as they are searching for relevant information using the top center search bar. Using the native SharePoint search a user can quickly pull all reports written by a given doctor, or any connected to a particular facility – no folders required.
Step 4 – Create Computer Readable Columns
Second, we need to add columns that will store meta data for the computers to read. Example columns include ‘Contact GUID’ and ‘Facility GUID’. These are critical for retrieving documents accurately and are required for the rest of the technique to work. I also highly recommend adding a column called ‘dataURI’ which we will use to retrieve documents in a canvas app with the PDF viewer.
*When creating columns, pay attention to the type of data and the maximum number of characters. GUIDs are a set length test type and most named fields can reasonably be assumed to be less than 200 characters, but this is up to the judgement of the library creator. The dataURI field needs to be ‘multiple lines of text’ as it will contain a very long text string.
In the example below I have kept it simple by only adding columns for Contact Name, GUID and dataURI. The green highlighting shows where you can add additional columns.
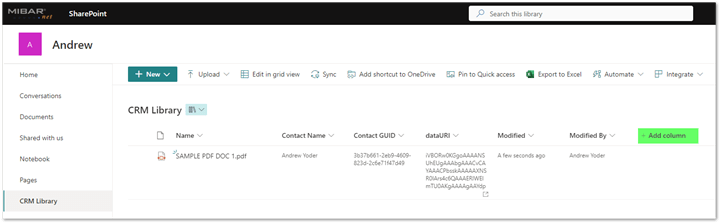
That is it! The document library is ready to go.
Summary
The key to the success of this technique is thinking about document storage in terms of a database, rather than nested files. To that end, a database functions based on filtering columns and sorting the results, so it is critical that we add this information automatically to make for easy retrieval in the future. The next posts in this series will talk about ways to use Power Automate flows to create and upload documents while filling in these columns so users don’t even have to think about it, but they are creating documents that will be easy for others to find in the future. Later posts will cover techniques to quickly retrieve these documents for your users.
Part 2: Creating & Adding Documents
Creating PDFs and tagging metadata automatically
A common client request involves getting data out of the Power Platform and into a PDF document. The specifics of doing this have been detailed at length in various other blog posts and it is easy to find many examples by searching on the web. Previously, I published an article that shows how to set up a flow for document creation called “Try, Try Again”. <LINK>
This post, however, is specifically about adding documents to the SharePoint Library we set up in part 1 of this series. <LINK> Presuming you have a Power Automate flow that is properly filling a Microsoft Word Template and creating a PDF, your next step will be to save it on SharePoint. Most blog posts I’ve seen on this subject stop once the document is saved, but I think this is missing a critical opportunity to leverage the database structure of SharePoint to save metadata to the document record so that it can be easily searched and filtered by users later. Metadata is data about data so we are going to be adding descriptive tags to records so we can more easily find them.
To fill in the extra SharePoint columns using your flow, add the actions “Get file content” and “Update file properties”. “Get file content” retrieves the needed data to populate the dataURI column in the second action, using this expression: datauri(base64ToBinary(body(‘Get_file_content’)?[‘$content’]))
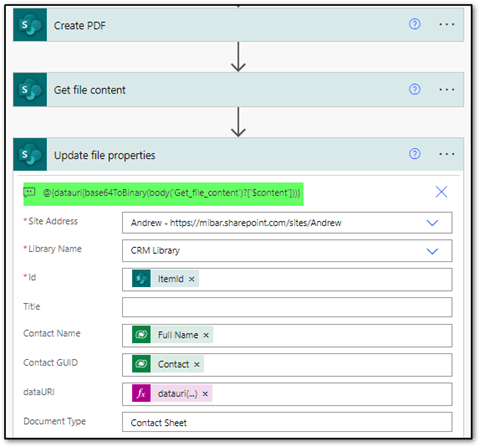
Finally, you can fill in the CRM Library columns using dynamic content, the most important being the Contact GUID.

Part 2: Creating & Adding Documents
Copying file from CRM field to CRM Library
While the previous post <LINK> in this series describes a process in while we are creating a PDF for storage in our CRM Library, this post explores another common business scenario. I have a client who is routinely sent medical clearance PDFs that need to be saved to a CRM record. Work cannot proceed until a user uploads the completed form, and in addition this document needs to be easily accessed by others, so we need to add it to the library and tag it with metadata.
Flow: OnUpload- Medical Clearance Document
- The trigger condition checks that the document field has been updated and is not null.
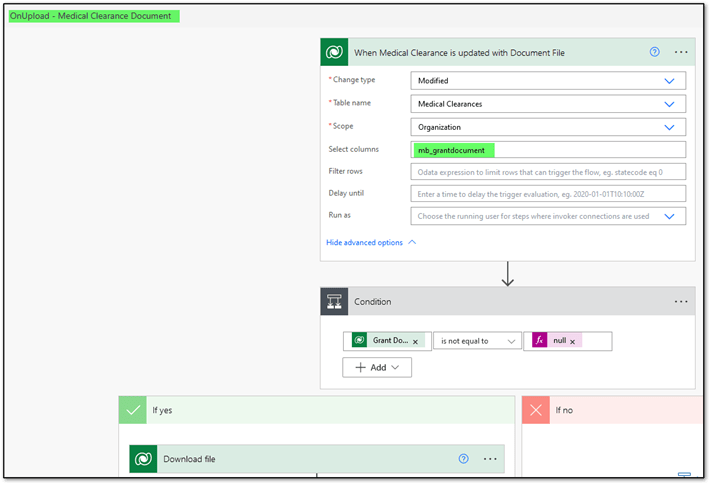
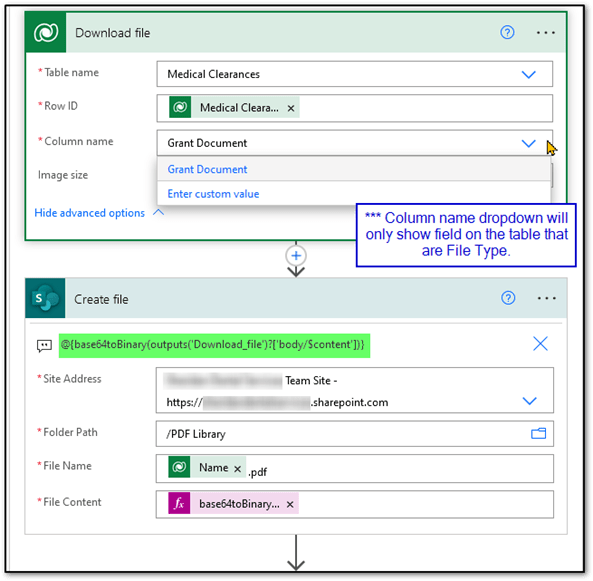
- We then use a special Dataverse action called “Download file” and create that file in our SharePoint Library.
- Finally, we get related record data, so we know enough to fill in the metadata tags and Update file properties.

Part 3: Retrieving Documents
The Command Ribbon Button: Your Gateway to Efficiency
Introduction
This blog post will guide you through the process of creating a Command Ribbon Button in a Model-Driven App. This button will open a SharePoint library in a new tab, pre-filtered to show only documents related to the current record in Dynamics 365. This is achieved by dynamically generating a URL based on the current record’s GUID.
Understanding SharePoint’s URL Filtering
Before proceeding, it’s crucial to understand how SharePoint filters records through URL parameters. Navigate to the SharePoint library and experiment with different filters. Observe the URL to see how it changes with each filter. Typically, you’ll find parameters like filterValue= followed by your filtering criteria.
Steps to Create the Command Bar Button
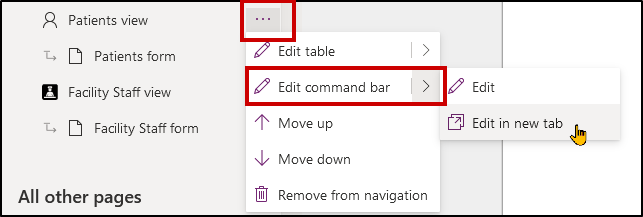
Step 1: Open Model-Driven App Editor
Open the Model-Driven App Editor and navigate to the command bar editor for the primary record’s main form.
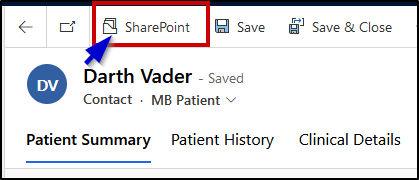
Step 2: Create a New Button
Create a new button and label it “SharePoint”.
Step 3: Set up Power Fx Run Formula
In this step, we’ll use Power Fx to set up the Run Formula action. You’ll be inserting the formula into the OnSelect property of the button.
Example Power Fx Code
Here’s an example based on a SharePoint Library located at https://<yourorghere>.sharepoint.com/PDF%20LibraryYou will need to find and insert your own SharePoint URL.
Power Fx Code
OnSelect=Launch(“https://<yourorghere>.sharepoint.com/PDF%20Library/Forms/Sorted%20Documents.aspx?newTargetListUrl=%2FPDF%20Library&viewpath=%2FPDF%20Library%2FForms%2FSorted%20Documents%2Easpx&FilterField1=Patient%5Fx0020%5FGUID&FilterValue1=”&Self.Selected.Item.Contact)
Code Explanation
- Launch(): This function opens a new browser window or tab.
- Inside Launch(), we’re concatenating the base URL of the SharePoint Library with filtering parameters:
- FilterField1=Patient%5Fx0020%5FGUID: Specifies that we want to filter based on a SharePoint library column named “Patient GUID”.
- FilterValue1=: This is the value that we’ll be filtering on.
- & Self.Selected.Item.Contact: This part dynamically appends the GUID of the selected contact record from the Model-Driven App to complete the filtering criterion.
Once the button is clicked, it triggers this Power Fx code to launch a new tab that opens the SharePoint Library, pre-filtered based on the current record’s GUID.
Step 4: Save and Publish
After you’ve set up the Power Fx code, save and publish your changes.
Conclusion
Once published, the button will appear in the Model-Driven App. Users can click it to open a new tab showing only documents related to the current record’s GUID. This makes it easier for users to find relevant documents quickly.

SharePoint and Dynamics 365: A Seamless Integration
Introduction
This post aims to showcase the powerful built-in search, filtering, and sorting functionalities of SharePoint libraries. By the end, you’ll understand why these features make SharePoint Libraries a superior option for document management compared to traditional File Explorer methods.
The Power of SharePoint’s Native Features
Search Bar
The search bar at the top allows for quick and robust searches across all documents in the library. It’s not just limited to file names; you can search within the contents of documents, provided they are indexed properly.
Column Sorting
Column headers offer an intuitive way to sort files based on various metadata like date created, author, or custom tags. A simple click can rearrange your files in ascending or descending order.
Column Filtering
Much like an Excel spreadsheet, SharePoint libraries allow you to filter documents based on column values. This is particularly useful when you have a large set of files and need to narrow down your options.
SharePoint vs. Traditional File Explorer
Nested Folders
In traditional File Explorer systems, documents are often saved in nested folders. This requires you to remember the exact folder structure or use a search function that may not be as powerful as SharePoint’s.
Training and Maintenance
Navigating through nested folders requires training, especially for new employees. It’s also a challenge to maintain this structure as your document count grows.
Lack of Metadata
File Explorer doesn’t offer an easy way to tag files with metadata, making it difficult to perform detailed searches or categorize files effectively.
The Importance of Metadata in SharePoint
One of the cornerstones of SharePoint’s effectiveness is its ability to make use of metadata. Properly tagged documents are easier to search for, sort, and filter, making your document management system highly efficient.
SharePoint libraries come with out-of-the-box features that are not only user-friendly but also powerful. When compared to traditional methods of file storage, SharePoint offers a more organized, searchable, and manageable solution, provided that you invest a little time in setting up your metadata correctly.
Bridging the Gap with Dynamics 365
While SharePoint itself offers a robust solution for document management, its power is multiplied when integrated with Dynamics 365. Through a simple Command Ribbon Button, as discussed in a previous blog post, users can effortlessly access SharePoint’s enhanced features without leaving the Dynamics 365 environment. Now, let’s delve into how this integration can help you overcome some of the limitations present in Dynamics 365’s native document management capabilities.
Breaking Free from Dynamics 365 Limitations
Dynamics 365 is powerful, but when it comes to document management, it has its limitations:
- Limited Search Capabilities: Dynamics 365 doesn’t offer the same depth of search functionality as SharePoint, especially when it comes to searching within the contents of a document.
- No Column-based Filtering or Sorting: Dynamics 365’s document interface doesn’t offer the same level of granularity in filtering and sorting documents as SharePoint does.
Expanding Your Search in SharePoint
Once you’re in SharePoint via the Command Ribbon Button, you’re not limited to just the pre-filtered view. You can easily remove or adjust filters, use the search bar, and sort columns to find exactly what you’re looking for, taking full advantage of SharePoint’s capabilities.
Conclusion: The Best of Both Worlds
By integrating SharePoint’s superior document management features with Dynamics 365 via a Command Ribbon Button, you create a streamlined, efficient workflow. Users get the best of both platforms: the CRM capabilities of Dynamics 365 and the document management prowess of SharePoint.
Viewing PDFs in Canvas Apps: A Seamless Experience with SharePoint and Power BI
Introduction
This final installment in our series dives into the advanced functionality of viewing PDFs within Canvas Apps. By leveraging Power Automate, SharePoint, and the PDF Viewer component in Canvas Apps, you can create a rich, searchable, and interactive PDF experience.
Components Involved
- Canvas App PDF Viewer: As of the time of writing, this component is in preview but offers functionality like zoom, scroll, and keyword search within the PDF.
- Data URI: This is the crucial link that feeds the PDF into the Canvas App.
- Power Automate: On-the-fly automation to fetch the PDF from SharePoint and generate the Data URI.
Step-by-Step Guide
You will want a canvas app that has a gallery alongside showing a filtered list of documents from which the user will select. Here is an example:

1. Canvas App Configuration
When a user selects a PDF from a gallery within the Canvas App, a Power Automate flow is triggered. In the Canvas App I have a button on each gallery item that selects the parent component.
btn_Select:OnSelect= (Select(Parent)
This then triggers the following code for the Gallery> OnSelect Property. I am passing the flow the needed identifier to find the document in the SharePoint Library.
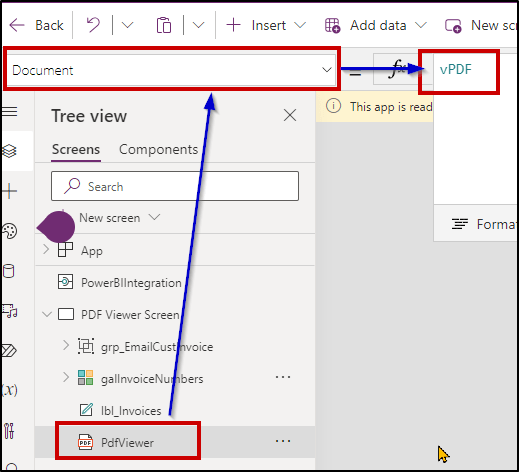
Gallery: OnSelect = Set( vPDF, GetDataURI.Run(galInvoiceNumbers.Selected.’Invoice Number’).result)
This code is setting a variable (vPDF) to equal the result of our dataURI generating flow. The variable vPDF is inside the PDF viewer’s Document property:
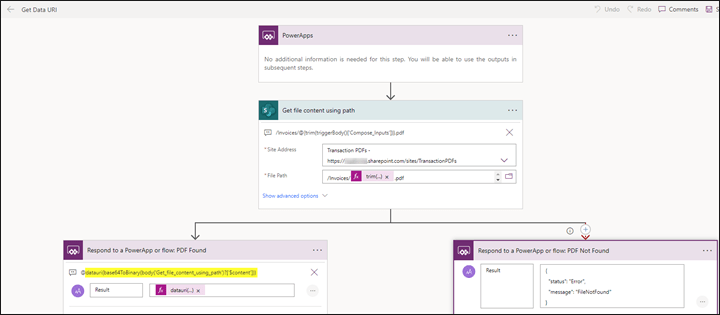
2. Fetch and Generate Data URI
The flow is very basic, getting file content from SharePoint and then generating the Data URI as a result.
Key expression: datauri(base64ToBinary(body(‘Get_file_content_using_path’)?[‘$content’]))
3. Display in PDF Viewer
The Data URI is sent back to the Canvas App, where the PDF Viewer component renders it.
Advanced Filtering with Power Fx
Use Power Fx to pre-filter the gallery of available PDFs. For example, in a medical scenario, you could filter to only show PDFs related to the current patient’s record.
Integration with Power BI
This technique can be extended to an embedded Canvas App within a Power BI report, allowing for real-time invoice viewing and powerful data filtering capabilities.
Benefits
- Full PDF Functionality: Users can search within the PDF, zoom in/out, and scroll through pages.
- Dynamic Data Filtering: Whether it’s through Power Fx in Canvas Apps or Power BI’s filtering engine, you get real-time, relevant data.
- Ease of Use: Users can effortlessly locate and view PDFs, making the system highly user-friendly.
Conclusion
This technique offers a unified experience by integrating the best features of Canvas Apps, SharePoint, and Power BI. It enables users to access relevant PDFs quickly and easily, enhancing productivity and data interaction.

Leave a comment